![]()

Specialists in 10mm models for the discerning wargamer
from Caesar
to Rommel… and beyond

COMBAT
WORKSHOP:
 |
 |
 |
 |
 |
 |
 |
 |
Click on the links above to view the galleries.
We welcome any comments, feedback or requests you may have. Click the Contact Me link above to have your say.
This part of the Pendraken Miniatures World War II Model Gallery is given over to tips and hints for converting or adding detail to your models.
I hope to continually add to this area and also invite you to submit and share your hints, tips or ideas with fellow 10mm wargamers and collectors.
Thanks for your help.
PROJECT |
DESCRIPTION |
US M10 |
|
VEHICLE BAGGAGE |
You can apply this to any vehicle and is a great way to add individuality to your forces. You can raid your spares box for bits to add or use milliput (I use the white version, it's available from most hobby stores) to sculpt on the baggage. You'll need a blade and needle files to help model the shapes you need and a pin, or similar, to add detail. It'll take time and practise to get things right but it's well worth the effort.
|
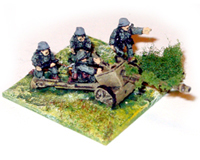
VEHICLE |
Similar to the addition of baggage to a vehicle, foliage can be added using milliput and detailled using a pin or cocktail stick. The technique is to push a blob of mixed Milliput onto the model, then spread it over the area you want covered. Once in place use the pin and prod into the milliput creating a texture. Again this will take practise but once painted up will add to your models look.
|
 Currently
There's no US version of the
M10
in the Pendraken range, the
version available is the
British M10 with 17pdr.
The main visual difference
between
the two is
the barrel - the US 3'' gun
didn't have a muzzle brake
where as the 17pdr did.
Currently
There's no US version of the
M10
in the Pendraken range, the
version available is the
British M10 with 17pdr.
The main visual difference
between
the two is
the barrel - the US 3'' gun
didn't have a muzzle brake
where as the 17pdr did.